
Pack and go — why not with your home as well?
PackPrefab Homes logo
0%

A Solar-Ready Prefabricated Home can make future solar installation simpler, but “solar-ready” is not a promise of low bills or easy installation. The details matter: roof structure, usable roof area, conduit routes, electrical-panel capacity, and local shade. A vent pipe in the wrong spot can complicate a neat panel layout. Small choices count.

The opportunity is substantial. NREL’s 2016 assessment, Rooftop Solar Photovoltaic Technical Potential in the United States, estimated that suitable U.S. rooftops could support about 1,118 gigawatts of solar capacity and generate roughly 1,432 terawatt-hours annually. That is a national technical estimate, not a prediction for any one home. The U.S. Department of Energy’s PV-Ready guidance also highlights practical planning, including roof space and wiring pathways. Ask the builder which provisions are included, and request drawings or specifications rather than relying on a sales label.

This guide offers seven tips for evaluating a solar-ready prefabricated home before signing a contract. You’ll learn what to check in the roof design, electrical setup, equipment documentation, and site plan. You’ll also see why future energy needs and installation costs deserve attention. There is no perfect checklist. I would still ask an independent solar professional to review the plans, especially when trees, snow, or unusual roof shapes are involved. A little scrutiny now can prevent costly surprises later.
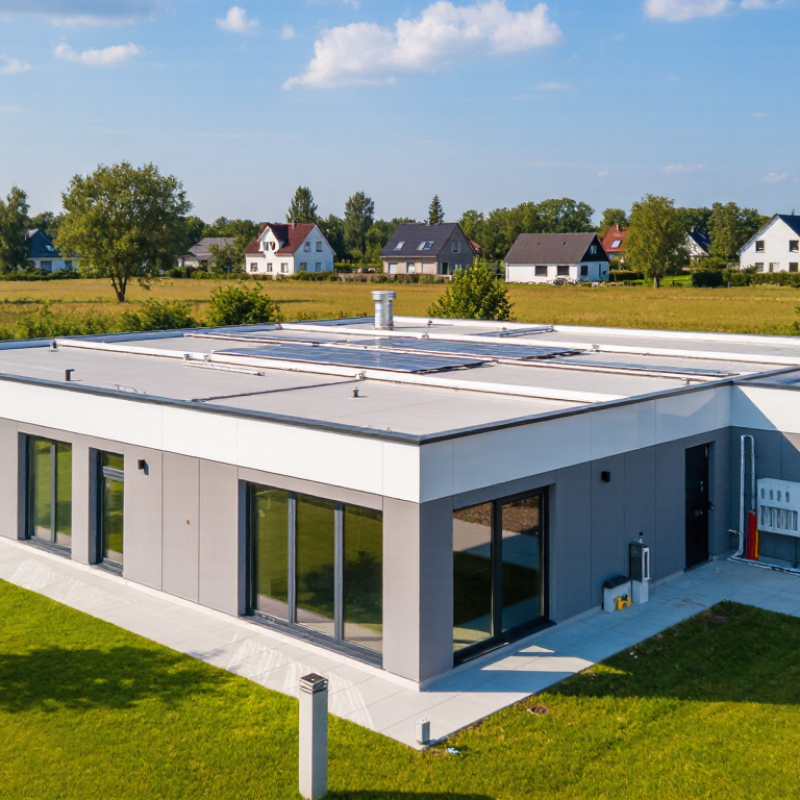
7 Tips for Buying a Solar Ready Prefabricated Home

Define Solar-Ready Features in a Prefabricated Home

A solar-ready prefabricated home should be prepared for installation, not merely advertised as compatible with solar. Look for a roof plan showing clear, unshaded space, suitable orientation, and structural capacity for panels, mounting hardware, and local weather loads. Ask for the roof-load assumptions in writing. A structural engineer’s review is more useful than a vague promise.

The U.S. Department of Energy’s solar-ready guidance emphasizes planning for roof space, electrical pathways, and equipment connections before construction. In practice, that means a reserved conduit route from the roof to the electrical panel, accessible panel capacity, and a designated inverter or battery location. Check the drawings. Lawrence Berkeley National Laboratory’s Tracking the Sun 2024 report puts the median size of new residential solar systems at about 7.4 kilowatts, a useful reference when discussing future system sizing—not a guarantee that every roof can support that capacity. Ask the builder to document assumptions about shading, roof penetrations, and wiring access. These details can be easy to overlook in a factory-built home, where changes after delivery may be awkward or costly. “Solar-ready” is not a universal specification, either; compare the actual plans, not just the label.

7 Tips for Buying a Solar-Ready Prefabricated Home

Solar-ready features make it easier to add solar panels later. Check for an unshaded roof area, suitable roof orientation, structural capacity, a clear conduit route, electrical-panel space, an accessible inverter location, and complete system-ready plans.

Estimated Roof Area for Future Solar Panels

Planning estimate: assumes 400-watt panels occupying about 21 square feet each. Values exclude required roof setbacks, access paths, spacing, and shaded areas; confirm the usable area and structural requirements with a qualified local professional.

Assess Site Sunlight, Roof Orientation, and Local Requirements

Before choosing a solar-ready prefabricated home, check the site at different times of day and across seasons. A sunny afternoon can hide winter shade from a neighboring roof or tall trees. Note where shadows fall, and photograph the roof area in the morning and late afternoon. Small details matter. A vent, dormer, or future tree can limit usable panel space.

Roof orientation affects output, but it is not the only factor. In the Northern Hemisphere, south-facing roof areas often receive strong sun, while east- and west-facing areas may still work well. Ask a qualified installer to model the site’s actual location, roof angle, and shading. NREL’s 2016 rooftop solar assessment estimated 1,118 gigawatts of technical capacity across U.S. rooftops, with potential generation of 1,432 terawatt-hours annually. Those are national estimates, not a promise about one home’s production. (NREL, Rooftop Solar Photovoltaic Technical Potential in the United States: A Detailed Assessment, 2016.)

Check local requirements before finalizing the home’s layout. Planning rules, utility interconnection steps, fire-access clearances, and structural standards can affect panel placement. Ask the local building department and utility what applies to your parcel. Also confirm that the roof structure accounts for expected panel weight, wind, and snow. A site sketch helps, but it can miss things. Recheck it with local professionals before ordering.

Check Roof Strength, Wiring, and Solar Equipment Provisions

Tip 1 Ask for the roof’s structural drawings and rated load capacity before choosing a solar-ready prefabricated home. Solar panels add weight, and local snow or wind can affect the design requirements. Have a qualified structural professional confirm that the roof framing can handle the planned system. Look closely at trusses, rafters, and attachment points. A sales description alone is not enough.

Tip 2 Check the electrical provisions with a qualified electrician. Confirm that the main panel has suitable capacity and space, and ask whether wiring routes, conduit, grounding, and a solar connection point are included. Trace the proposed route from the roof to the electrical equipment area. A neat diagram helps. Small differences between factory drawings and the finished home can still cause delays, so verify the actual installation.

Tip 3 Review where solar equipment could go. The home should allow practical space for an inverter, disconnects, and, if desired, a battery, with appropriate access and ventilation. Ask whether roof penetrations are planned and how they will be sealed. Check for vents, skylights, and shaded roof sections that may limit panel placement. I would not assume “solar-ready” means every component is included; request a written list and have the plans reviewed before purchase.

Compare Installation Costs, System Compatibility, and Upgrade Options

A “solar-ready” label can mean little more than empty roof space and capped wiring. Ask for a written list of included provisions: conduit, roof reinforcement, panel capacity, and an inverter-ready connection. Then compare the home’s base price with the cost of adding those items later. Small details matter. A crowded electrical panel or a long cable route can add labor and equipment costs.

NREL’s U.S. Solar Photovoltaic System and Energy Storage Cost Benchmark: Q1 2023 modeled residential installation costs at $2.90 per watt of direct-current capacity for solar alone, versus $4.50 with storage. These are modeled benchmarks, not local quotes. Compare bids with the same system size, battery capacity, roof work, and permitting assumptions.

Check compatibility, too: roof orientation and shading affect production, while panel capacity and inverter limits shape future upgrades. Can the system support a battery, electric vehicle charging, or a larger array without replacing major components? Get the answer in writing.

One thing I might overlook: a “future-ready” design can still need costly upgrades. Ask for itemized prices now, plus the model numbers and capacity limits of the included electrical equipment.

Review Certifications, Warranties, and Future Expansion Plans

A solar-ready label is a starting point, not proof that a home is prepared for every system. Ask for the relevant electrical and structural documents, and check what each certification actually covers. A certificate may apply to one component, not the complete home. Paperwork matters. Compare warranty terms for the roof, wiring, and any pre-installed equipment. Look for exclusions involving roof penetrations, moisture, or later modifications. Check who handles a claim and whether labor is included. A long warranty can still be limited.

Think beyond the first installation. Ask whether the electrical panel has spare capacity and whether conduit runs from the roof to the inverter location. Confirm that the roof structure can support the planned panels, and identify a safe, ventilated space for a future battery. Leave room. Expansion may require added electrical work, so request a written estimate rather than relying on a sales conversation. It is easy to overvalue a neat “solar-ready” checklist; the actual wiring path and available space matter more. Plans change, too. Have the builder document what is installed now, what is merely reserved, and what a later upgrade could cost.

7 Tips for Buying a Solar Ready Prefabricated Home — Review Certifications, Warranties, and Future Expansion Plans

Tip What to Review Questions to Ask Why It Matters Useful Documents or Evidence
1 Confirm what “solar ready” means Does the home include only a reserved roof area, or does it also have conduit, wiring pathways, a suitable electrical panel, and an accessible equipment location? The term “solar ready” can describe different levels of preparation. A clear scope helps you avoid assuming that solar equipment or installation is included. Written scope of work, electrical plans, roof plans, and a list of included and excluded solar components.
2 Check applicable certifications and code compliance Which building, electrical, and energy-efficiency requirements apply at the delivery site? Are listed components specified for the proposed system? Requirements vary by location and by whether the home is built in a factory, installed on site, or treated as a manufactured home. Solar equipment and installation must also meet applicable local rules. Relevant inspection or certification records; permits and approvals as required locally; equipment documentation. For example, UL 1741 relates to inverter equipment, while UL 2703 relates to photovoltaic mounting systems.
3 Assess roof capacity and usable area Has the roof structure been evaluated for the expected added load? Are orientation, shading, roof obstructions, and future maintenance access considered? Solar suitability depends on site conditions and structural design. A reserved roof area alone does not confirm that a roof is suitable for a particular array. Structural drawings or an engineering assessment, roof layout, and a site-specific solar evaluation before system installation.
4 Review electrical-panel and wiring provisions Is there a documented path from the roof to the electrical equipment area? Has the panel capacity and any future upgrade requirement been identified? Conduit routes, panel configuration, and utility interconnection requirements can affect installation cost and feasibility. A qualified electrician should confirm the design for the location and planned system. Electrical single-line diagram, panel schedule, conduit specifications, and a written assessment of possible upgrades.
5 Compare warranty coverage and exclusions Which warranties cover the home structure, roof, electrical work, and any included solar components? Who handles claims, and could later roof work affect coverage? Warranties may come from different parties and have different terms, exclusions, and claim procedures. Do not assume that a home warranty covers solar equipment or installation. Written warranty documents, coverage periods, maintenance requirements, exclusions, and contact details for each responsible party.
6 Plan for future system expansion Can the design accommodate a larger array, battery storage, or an electric vehicle charger? What limits might the roof, panel, inverter, or utility connection impose? Future additions may require compatible equipment, available electrical capacity, permits, and utility approval. Expansion capability should be verified rather than assumed. Design notes showing reserved space and capacity, equipment compatibility information, and confirmation of local permitting and utility-interconnection steps.
7 Get a site-specific installation and cost plan Who will evaluate the site and install the system? Does the estimate identify equipment, labor, permits, utility work, and any home modifications? Actual system size, production, costs, and schedule depend on the site, local rules, utility requirements, and chosen equipment. A detailed estimate makes comparisons more meaningful. Itemized proposal from a qualified installer, site assessment, estimated system design, permit responsibilities, and a clear list of assumptions.

FAQS

How can I check whether a site gets enough sunlight?

Visit the site in the morning and late afternoon. Photograph roof shadows, then check again in different seasons. Winter shade can surprise you.

Does a south-facing roof always produce the most solar power?

Not always. Roof angle, trees, nearby buildings, and local conditions also matter. Ask a qualified installer to model your actual site.

Which roof details can reduce usable panel space?

Vents, dormers, and future tree growth can limit the clear area. Mark them on a roof sketch. Recheck the sketch on site.

What local requirements should I check before ordering?

Ask the building department and utility about planning rules, interconnection steps, fire clearances, and structural standards. Details vary by parcel.

How can I tell what a solar-ready certification covers?

Request the relevant electrical and structural documents. Check whether each certificate covers one component or the complete home. Paperwork matters.

What should I review in the warranties?

Compare coverage for the roof, wiring, and installed equipment. Look for exclusions involving moisture, roof penetrations, and later changes. Check labor coverage, too.

What should the home include for future solar expansion?

Check for spare electrical-panel capacity and conduit from the roof to the inverter location. Confirm the roof can support planned panels.

Should I plan space for a future battery?

Yes. Identify a safe, ventilated space before ordering. Ask for a written upgrade estimate; a neat checklist may hide extra electrical work.

What should the builder document?

Ask for a written list of what is installed, what is only reserved, and possible upgrade costs. Plans change. A sketch can miss things.

Conclusion

Buying a Solar-Ready Prefabricated Home means looking beyond the floor plan to see whether the house can support a solar system now or in the future. Start by confirming what “solar-ready” includes, such as a suitable roof area, planned cable routes, electrical capacity, and space for related equipment. Then assess the building site: sunlight exposure, roof orientation, potential shading, and local requirements can all affect system design and performance.

Before committing, check that the roof structure and wiring provisions are appropriate, and ask which equipment the home can accommodate. Compare the cost of installing solar during construction with the cost of adding it later, while considering system compatibility and available upgrade options. Finally, review relevant certifications and warranty terms, and think about whether the home can support future expansion. A careful evaluation of these details can help you choose a prefabricated home that is practical, adaptable, and better prepared for solar energy.

Clara

Clara

Clara is a dedicated marketing professional with a deep understanding of the company’s products, customers, and industry landscape. With a strong background in market research, content strategy, and customer communication, she transforms complex product information into clear, practical, and......